


How to Convert QuickTime MOV to MKV Format?
What is MKV?
The Matroska Multimedia Container is an open standard free container format, a file format that can hold an unlimited number of video, audio, picture or subtitle tracks in one file. It is intended to serve as a universal format for storing common multimedia content, like movies or TV shows. Matroska is similar in concept to other containers like AVI, MP4 or Advanced Systems Format (ASF), but is entirely open in specification, with implementations consisting mostly of open source software. Matroska file types are .MKV for video (with subtitles and audio), .MK3D for stereoscopic video, .MKA for audio-only files and .MKS for subtitles only.
To convert QuickTime MOV to MKV format, we need the assistance of QuickTime MOV to MKV Converter. QuickTime MOV to MKV Converter is a professional software which supports various inputting and outputting audio/video formats, as well as a lot of powerful editing functions. Download its trial version for free and follow the following guide to see the easiest way to convert QuickTime MOV to MKV format with high output quality and fast conversion speed.
![]()
Steps of Converting QuickTime MOV to MKV format:
Step 1: Click "Add Video" button to import the QuickTime MOV video you want to convert. You can import several video files at a time.
.jpg)
Step 2: Select MKV as the output format from the drop-down list of "Profile".
Step 3: Click button "Browse" to set the destination for saving the converted files.
Step 4: Click button "Convert" to start the conversion from MOV to MKV.
The above four steps are all you need to do to convert MOV files to MKV format. If you want to adjust the effect of the original MOV video, or you just need a part of the original MOV video, you can use the edit functions as below.
> Effect
You can click button "Effect" to adjust Brightness, Contrast and Saturation. You can also check "Deinterlacing" checkbox to avoid mosaic and improve the quality of the video.
.jpg)
> Trim
If you only want to convert a segment of the entire video or do not want to convert some certain segment of the video, you can use the trim function.
.jpg)
> Crop
To get rid of the black border or to zoom in some part of the scene, you can click button "Crop" and then drag the yellow frame or adjust the values in the boxes. You can also select "Full Screen", "Keep Original", "16:9" or "4:3" from the drop-down list of "Zoom Mode".
.jpg)
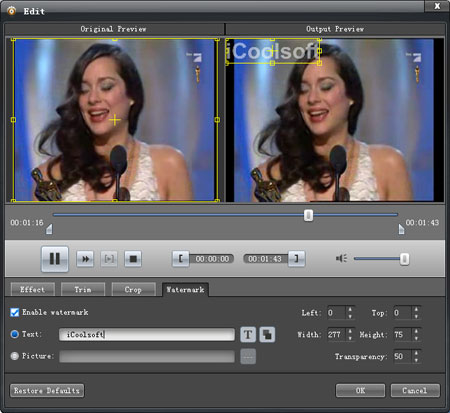
> Watermark
You can add text or picture watermark to the video.